---
title: Spring Boot + Doma2を使おう
tags: ["Doma2", "Java", "Spring", "Spring Boot"]
categories: ["Programming", "Java", "org", "seasar", "doma"]
date: 2016-01-11T12:55:16Z
updated: 2016-02-13T03:12:50Z
---
[Doma 2](https://github.com/domaframework/doma)の[Spring Boot連携機能](https://github.com/domaframework/doma-spring-boot)をリリースしたので、使い方を紹介します。
### 雛形プロジェクト作成
まずは雛形プロジェクトを[SPRING INITIALIZR](https://start.spring.io)から作成します。「Search for dependencies」に"Web"と"JDBC"とH2"を入力して選択してください。
 その後、「Generate Project」をクリックするとdemo.zipがダウンロードされます。zipを展開して、MavenプロジェクトをIDEにインポートしてください。
この記事ではIntelliJ IDEAを使います。IDEAの場合、`pom.xml`を開くだけでOKです。
`pom.xml`にSpring BootでDomaを使うために次のdependencyを追加します。
``` xml
org.seasar.doma.boot
doma-spring-boot-starter
1.0.1
```
### エンティティ作成
まずはエンティティクラスを作ります。Domaの慣習でフィールドの修飾子は`public`にしておきます。
``` java
package com.example;
import org.seasar.doma.Entity;
import org.seasar.doma.GeneratedValue;
import org.seasar.doma.GenerationType;
import org.seasar.doma.Id;
@Entity
public class Reservation {
@Id
@GeneratedValue(strategy = GenerationType.IDENTITY)
public Integer id;
public String name;
}
```
### DAOインタフェース作成
次にDAOインタフェースを作ります。検索系と更新系のメソッドを1つずつ用意します。
``` java
package com.example;
import org.seasar.doma.Dao;
import org.seasar.doma.Insert;
import org.seasar.doma.Select;
import org.seasar.doma.boot.ConfigAutowireable;
import org.springframework.transaction.annotation.Transactional;
import java.util.List;
@ConfigAutowireable
@Dao
public interface ReservationDao {
@Select
List selectAll();
@Insert
@Transactional
int insert(Reservation reservation);
}
```
`@ConfigAutowireable`はDomaの[@AnnotateWith](http://doma.readthedocs.org/ja/stable/config/#id22)を使って、生成されるDAO実装クラスに`@Repository`と`@Autowired`を付与するためのアノテーションです。
### DAO実行クラス生成
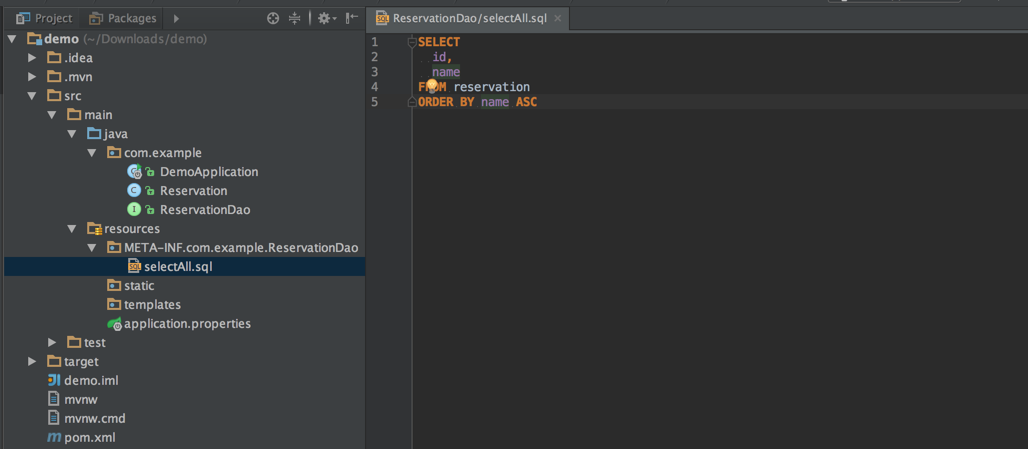
DAOインタフェースを作ったあと、IDEでビルドを行えばDAO実装クラスが自動生成されます。しかし、検索系メソッドにはコンパイル時に対応するSQLファイルを用意する必要があるため、コンパイルエラーになります。通常は`src/main/resources/META-INF/(FQCN)/(クラス名)/(メソッド名).sql`にメソッドに対応するSQLを記述します。今回の場合は`src/main/resources/META-INF/com/example/ReservationDao/selectAll.sql`です。
その後、「Generate Project」をクリックするとdemo.zipがダウンロードされます。zipを展開して、MavenプロジェクトをIDEにインポートしてください。
この記事ではIntelliJ IDEAを使います。IDEAの場合、`pom.xml`を開くだけでOKです。
`pom.xml`にSpring BootでDomaを使うために次のdependencyを追加します。
``` xml
org.seasar.doma.boot
doma-spring-boot-starter
1.0.1
```
### エンティティ作成
まずはエンティティクラスを作ります。Domaの慣習でフィールドの修飾子は`public`にしておきます。
``` java
package com.example;
import org.seasar.doma.Entity;
import org.seasar.doma.GeneratedValue;
import org.seasar.doma.GenerationType;
import org.seasar.doma.Id;
@Entity
public class Reservation {
@Id
@GeneratedValue(strategy = GenerationType.IDENTITY)
public Integer id;
public String name;
}
```
### DAOインタフェース作成
次にDAOインタフェースを作ります。検索系と更新系のメソッドを1つずつ用意します。
``` java
package com.example;
import org.seasar.doma.Dao;
import org.seasar.doma.Insert;
import org.seasar.doma.Select;
import org.seasar.doma.boot.ConfigAutowireable;
import org.springframework.transaction.annotation.Transactional;
import java.util.List;
@ConfigAutowireable
@Dao
public interface ReservationDao {
@Select
List selectAll();
@Insert
@Transactional
int insert(Reservation reservation);
}
```
`@ConfigAutowireable`はDomaの[@AnnotateWith](http://doma.readthedocs.org/ja/stable/config/#id22)を使って、生成されるDAO実装クラスに`@Repository`と`@Autowired`を付与するためのアノテーションです。
### DAO実行クラス生成
DAOインタフェースを作ったあと、IDEでビルドを行えばDAO実装クラスが自動生成されます。しかし、検索系メソッドにはコンパイル時に対応するSQLファイルを用意する必要があるため、コンパイルエラーになります。通常は`src/main/resources/META-INF/(FQCN)/(クラス名)/(メソッド名).sql`にメソッドに対応するSQLを記述します。今回の場合は`src/main/resources/META-INF/com/example/ReservationDao/selectAll.sql`です。
 ちなみに、↑の図では必要であるにも関わらず対応するSQLファイルがないメソッドは赤色で表示されています。このように表示させるにはIntelliJ IDEの[Doma Supportプラグイン](https://github.com/siosio/DomaSupport)をインストールする必要があります。Doma 2を使用するためにプラグインは必須ではありませんが、あると便利です。
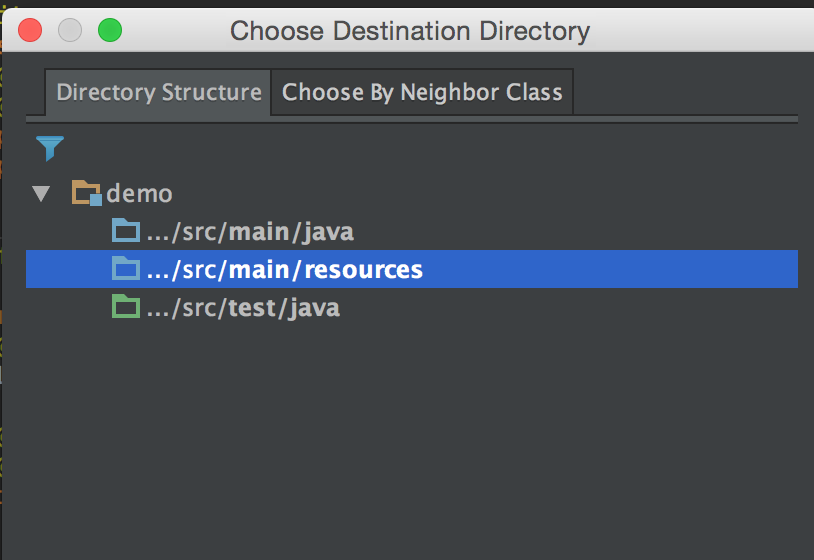
 このプラグインがあれば、メソッドに対して(Macの場合)`Option + Enter`で「SQLファイルを作る。」というメニューを選択することができます。
 `.../src/main/resouces`を選べば、対応するSQLファイルが生成されます。
 あとはこのSQLファイルにSQLを直接書けば良いです。
``` sql
SELECT
id,
name
FROM reservation
ORDER BY name ASC
```
あとはこのSQLファイルにSQLを直接書けば良いです。
``` sql
SELECT
id,
name
FROM reservation
ORDER BY name ASC
```
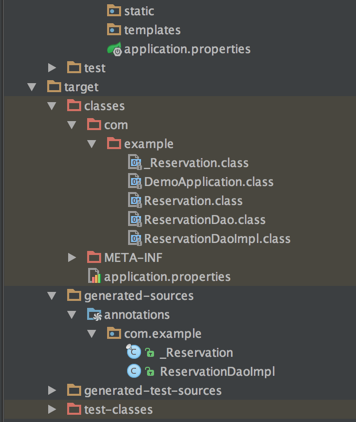
 再度ビルドを行い、コンパイルが成功すれば`target`以下に`ReservationDaoImpl`クラスが生成され、コンパイルされていることがわかります。
 ### アプリケーション作成
`DemoApplication`に`ReservationDao`を使った簡単なアプリケーションを作りましょう。
``` java
package com.example;
import org.springframework.beans.factory.annotation.Autowired;
import org.springframework.boot.CommandLineRunner;
import org.springframework.boot.SpringApplication;
import org.springframework.boot.autoconfigure.SpringBootApplication;
import org.springframework.context.annotation.Bean;
import org.springframework.web.bind.annotation.RequestMapping;
import org.springframework.web.bind.annotation.RestController;
import java.util.Arrays;
import java.util.List;
@SpringBootApplication
@RestController
public class DemoApplication {
public static void main(String[] args) {
SpringApplication.run(DemoApplication.class, args);
}
@Autowired
ReservationDao reservationDao;
// 起動時にReservationDao#insertで初期データを投入する
@Bean
CommandLineRunner runner() {
return args -> Arrays.asList("spring", "spring boot", "spring cloud", "doma").forEach(s -> {
Reservation r = new Reservation();
r.name = s;
reservationDao.insert(r);
});
}
@RequestMapping(path = "/")
List all() {
return reservationDao.selectAll();
}
}
```
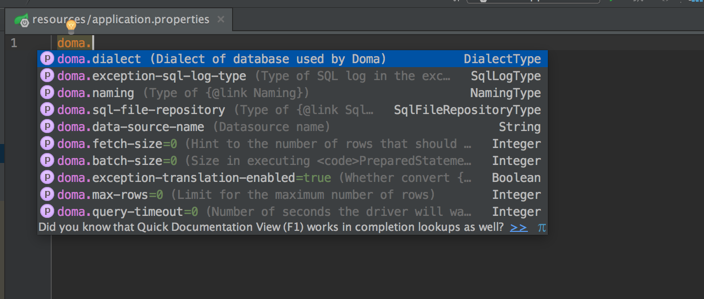
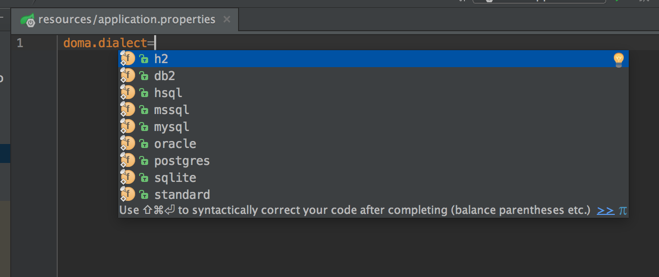
次にDomaが生成するSQLの方言を設定します。今回はH2データベースを使用するため、
`application.properties`に`doma.dialect=h2`プロパティを設定してください。
プロパティは`Ctrl + Space`で補完させることができます。
### アプリケーション作成
`DemoApplication`に`ReservationDao`を使った簡単なアプリケーションを作りましょう。
``` java
package com.example;
import org.springframework.beans.factory.annotation.Autowired;
import org.springframework.boot.CommandLineRunner;
import org.springframework.boot.SpringApplication;
import org.springframework.boot.autoconfigure.SpringBootApplication;
import org.springframework.context.annotation.Bean;
import org.springframework.web.bind.annotation.RequestMapping;
import org.springframework.web.bind.annotation.RestController;
import java.util.Arrays;
import java.util.List;
@SpringBootApplication
@RestController
public class DemoApplication {
public static void main(String[] args) {
SpringApplication.run(DemoApplication.class, args);
}
@Autowired
ReservationDao reservationDao;
// 起動時にReservationDao#insertで初期データを投入する
@Bean
CommandLineRunner runner() {
return args -> Arrays.asList("spring", "spring boot", "spring cloud", "doma").forEach(s -> {
Reservation r = new Reservation();
r.name = s;
reservationDao.insert(r);
});
}
@RequestMapping(path = "/")
List all() {
return reservationDao.selectAll();
}
}
```
次にDomaが生成するSQLの方言を設定します。今回はH2データベースを使用するため、
`application.properties`に`doma.dialect=h2`プロパティを設定してください。
プロパティは`Ctrl + Space`で補完させることができます。
 このまま起動するとテーブルが無くてエラーになるため、DDLスクリプトを用意します。Spring Bootではクラスパス直下の`schema.sql`を起動時に実行するので、`src/main/resources/schema.sql`にテーブルを作成するSQLを書けば良いです。
``` sql
CREATE TABLE reservation (
id IDENTITY,
NAME VARCHAR(50)
);
```
補足ですが、`spring.datasource.initialize=false`を設定すれば`schema.sql`の実行をスキップできます。デプロイ時はこのプロパティを指定すれば良いです。
あとは`DemoApplication`の`main`メソッドを実行すればアプリケーションが起動します。
http://localhost:8080 にアクセスすれば、`selectAll.sql`のSQLが実行され結果が返ります。
このまま起動するとテーブルが無くてエラーになるため、DDLスクリプトを用意します。Spring Bootではクラスパス直下の`schema.sql`を起動時に実行するので、`src/main/resources/schema.sql`にテーブルを作成するSQLを書けば良いです。
``` sql
CREATE TABLE reservation (
id IDENTITY,
NAME VARCHAR(50)
);
```
補足ですが、`spring.datasource.initialize=false`を設定すれば`schema.sql`の実行をスキップできます。デプロイ時はこのプロパティを指定すれば良いです。
あとは`DemoApplication`の`main`メソッドを実行すればアプリケーションが起動します。
http://localhost:8080 にアクセスすれば、`selectAll.sql`のSQLが実行され結果が返ります。
 ここまででSpring Boot + Doma2の連携の話は終わりです。
`application.properties`に設定可能な値は
https://github.com/domaframework/doma-spring-boot#properties-file-configuration
を参照してください。
簡単に使えるので試して[フィードバック](https://github.com/domaframework/doma-spring-boot/issues)をください!
### (おまけ)メソッド追加
せっかくなので、Doma2の2 way SQLを試せるようにメソッド(`selectByName`)を追加します。(Spring Bootは関係ありません)
``` java
@ConfigAutowireable
@Dao
public interface ReservationDao {
@Select
List selectAll();
@Select
List selectByName(String name);
@Insert
@Transactional
int insert(Reservation reservation);
}
```
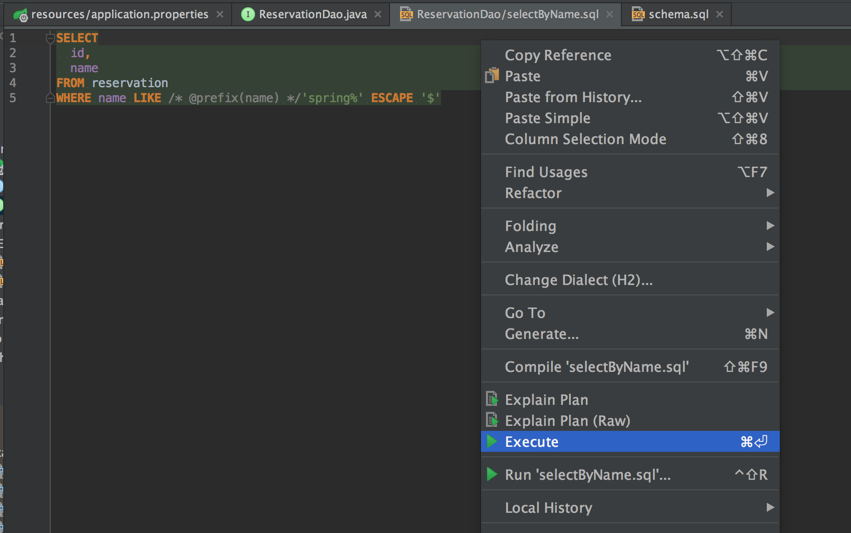
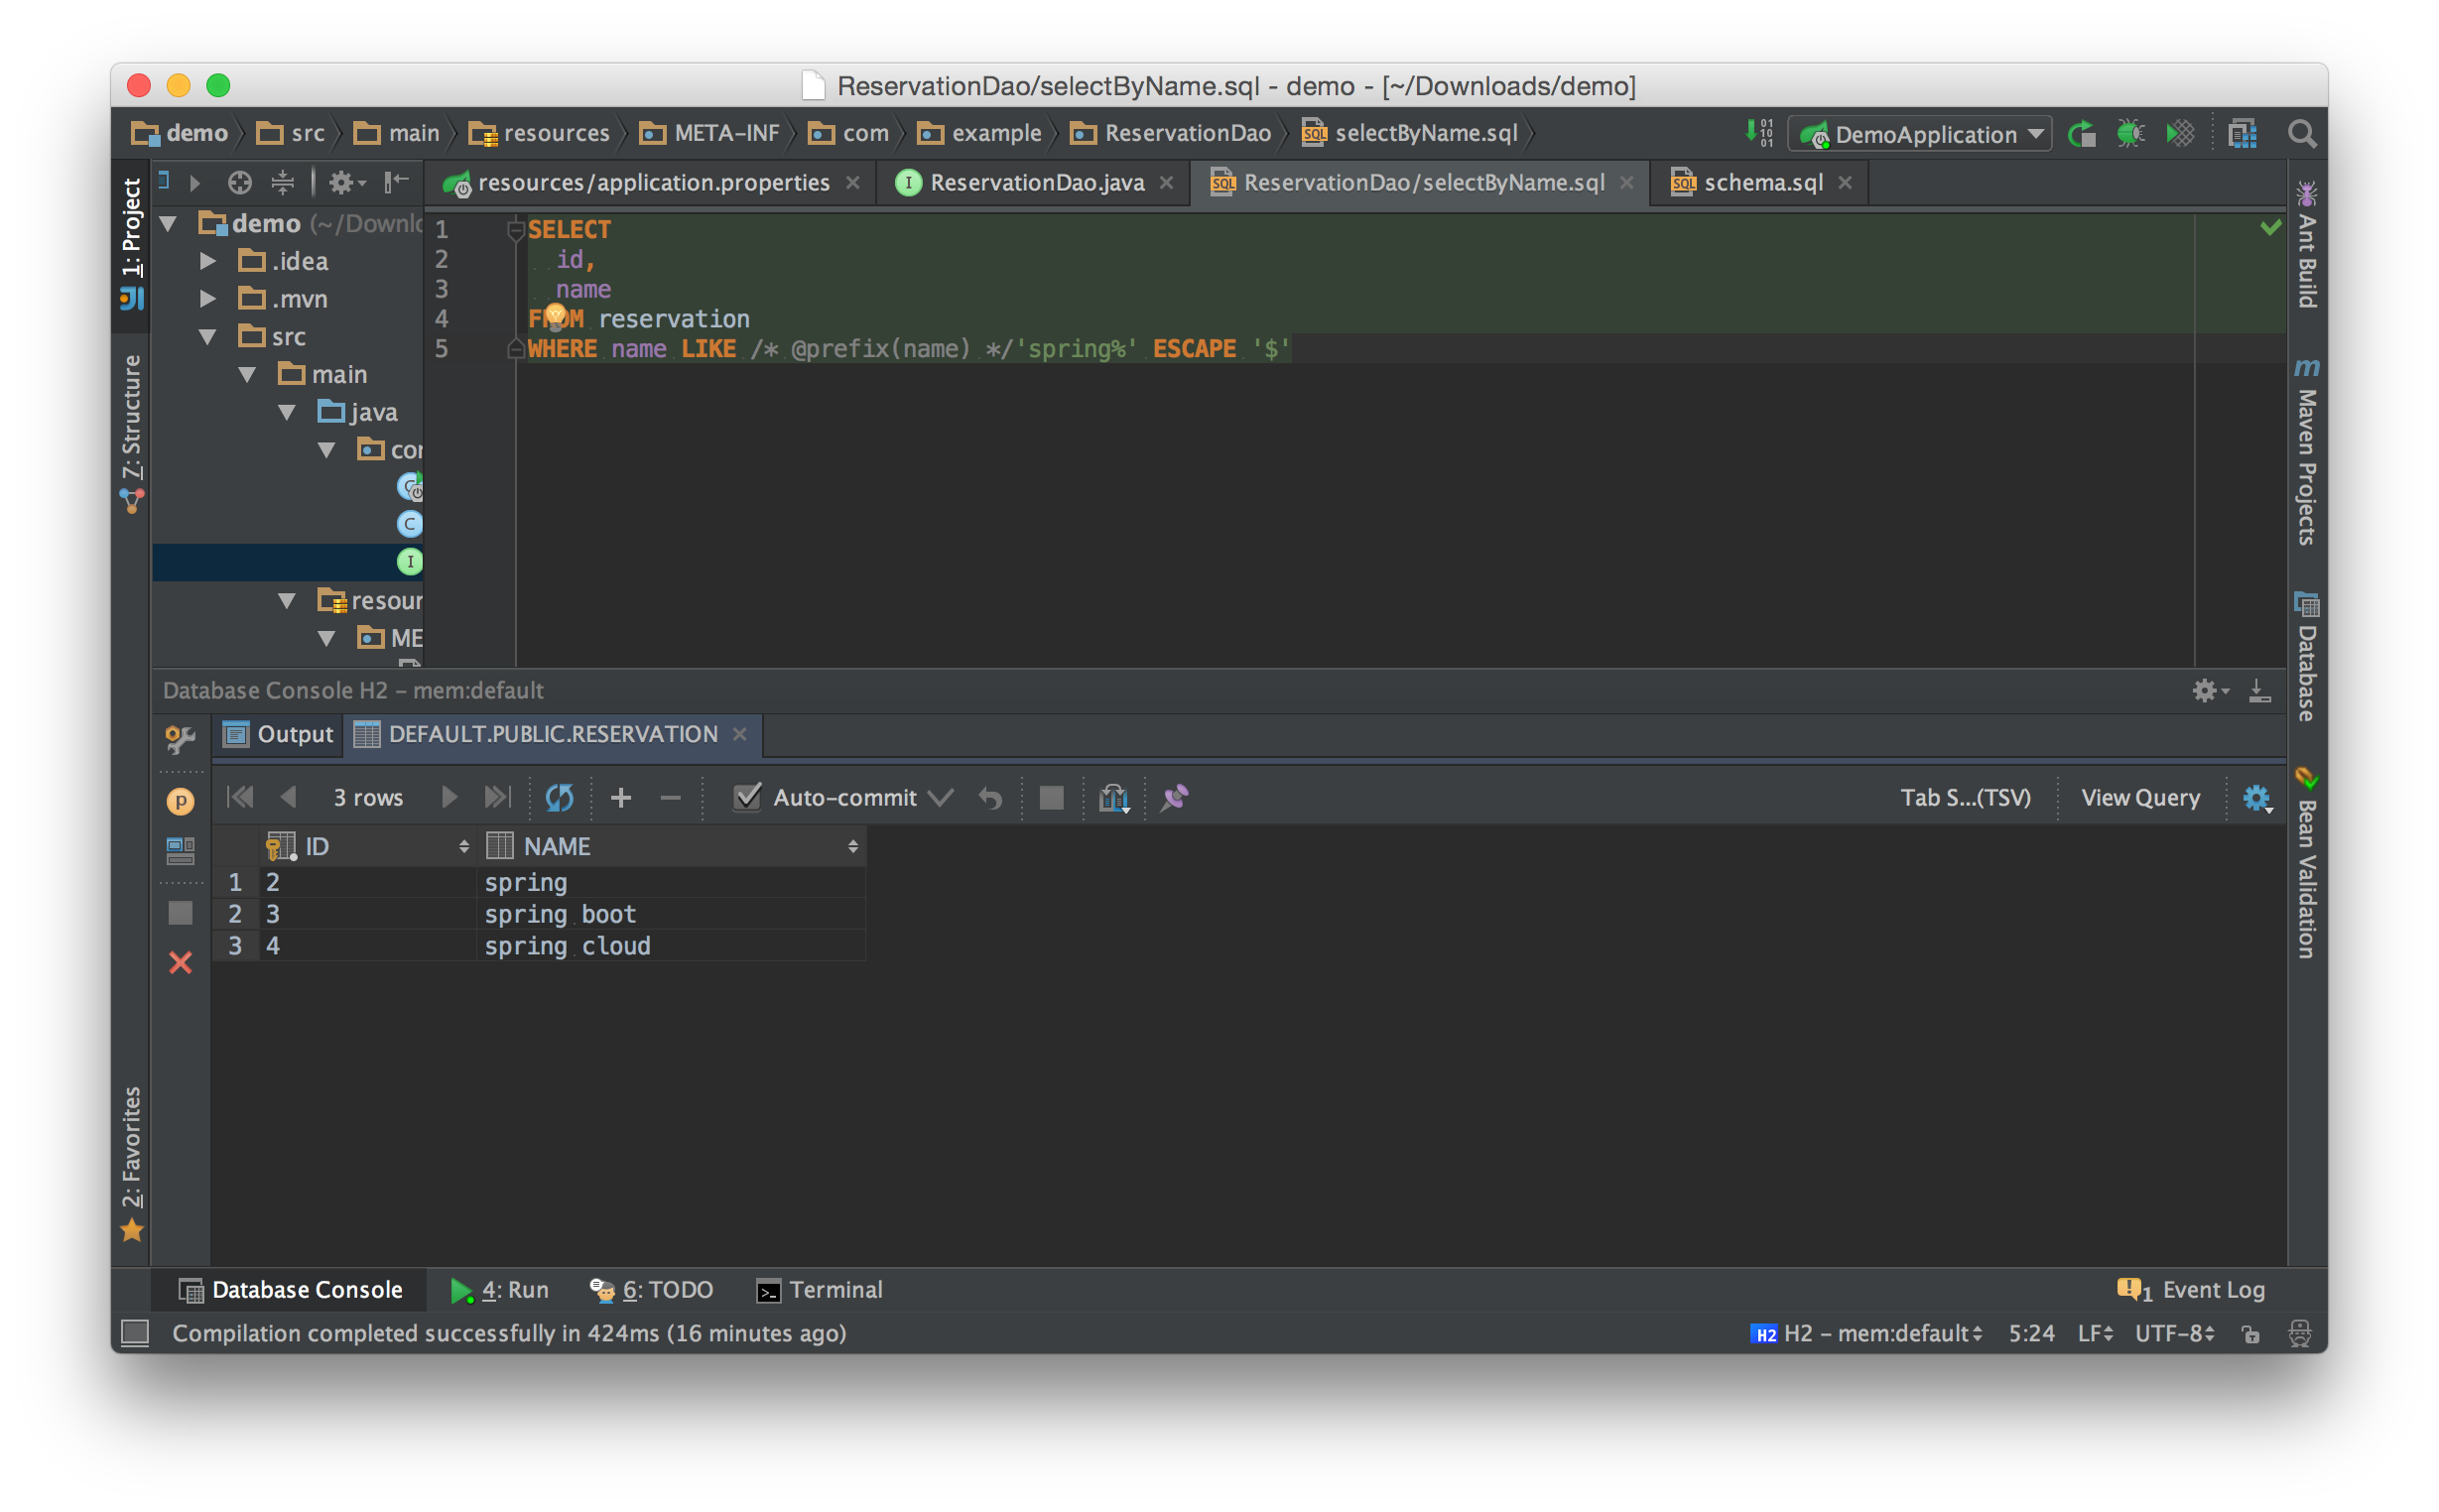
対応するSQLを`src/main/resources/META-INF/com/example/ReservationDao/selectByName.sql`に記述します。
``` sql
SELECT
id,
name
FROM reservation
WHERE name LIKE /* @prefix(name) */'spring%' ESCAPE '$'
```
書き方は[こちら](http://doma.readthedocs.org/ja/stable/expression/#id11)を参照。
SQLをそのまま実行できるので便利ですね。
ここまででSpring Boot + Doma2の連携の話は終わりです。
`application.properties`に設定可能な値は
https://github.com/domaframework/doma-spring-boot#properties-file-configuration
を参照してください。
簡単に使えるので試して[フィードバック](https://github.com/domaframework/doma-spring-boot/issues)をください!
### (おまけ)メソッド追加
せっかくなので、Doma2の2 way SQLを試せるようにメソッド(`selectByName`)を追加します。(Spring Bootは関係ありません)
``` java
@ConfigAutowireable
@Dao
public interface ReservationDao {
@Select
List selectAll();
@Select
List selectByName(String name);
@Insert
@Transactional
int insert(Reservation reservation);
}
```
対応するSQLを`src/main/resources/META-INF/com/example/ReservationDao/selectByName.sql`に記述します。
``` sql
SELECT
id,
name
FROM reservation
WHERE name LIKE /* @prefix(name) */'spring%' ESCAPE '$'
```
書き方は[こちら](http://doma.readthedocs.org/ja/stable/expression/#id11)を参照。
SQLをそのまま実行できるので便利ですね。
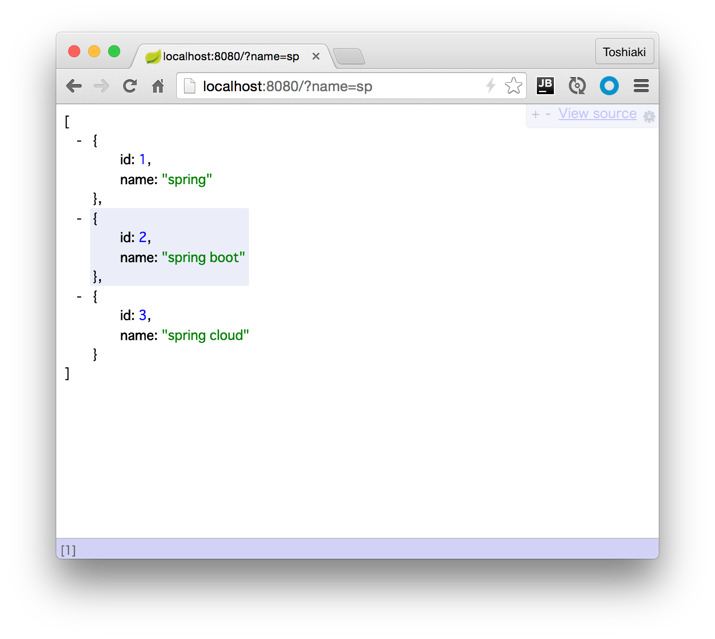
 Controllerに次のメソッドを追加して、`ReservationDao#selectByName`を呼び出すようにします。
``` java
@RequestMapping(path = "/", params = "name")
List name(@RequestParam String name) {
return reservationDao.selectByName(name);
}
```
Controllerに次のメソッドを追加して、`ReservationDao#selectByName`を呼び出すようにします。
``` java
@RequestMapping(path = "/", params = "name")
List name(@RequestParam String name) {
return reservationDao.selectByName(name);
}
```
 以上。コードは[こちら](https://github.com/making/doma2-spring-boot-demo)です。