---
title: Spring Cloud Configで動的コンフィギュレーション管理
tags: ["Java", "Spring", "Spring Cloud", "Spring Cloud Config"]
categories: ["Programming", "Java", "org", "springframework", "boot", "cloud", "config"]
date: 2014-10-25T18:55:23Z
updated: 2014-10-26T08:20:44Z
---
## Spring Cloud Configとは
[Spring Cloud Config](http://cloud.spring.io/spring-cloud-config/)は分散システムにおけるコンフィギュレーションの仕組みを提供するプロジェクト。[SpringOne 2gx 2014](http://springone2gx.com/)に参加して、一番面白いと思ったネタである。
Spring Cloud ConfigはClientとServerで構成される。
SeverはGitやファイル等の外部コンフィギュレーションを管理し、中央集権的に全てのClinetにコンフィギュレーションを提供し、
ClientはSpring Frameworkが元々もっている`Environment`や`PropertySource`といった設定の抽象化の仕組みを利用して、Severから取得したコンフィギュレーションを保持する。また、コンフィギュレーションを再読み込みする仕組みも提供する。
これらを利用したシステムの最小構成は以下のようになる。
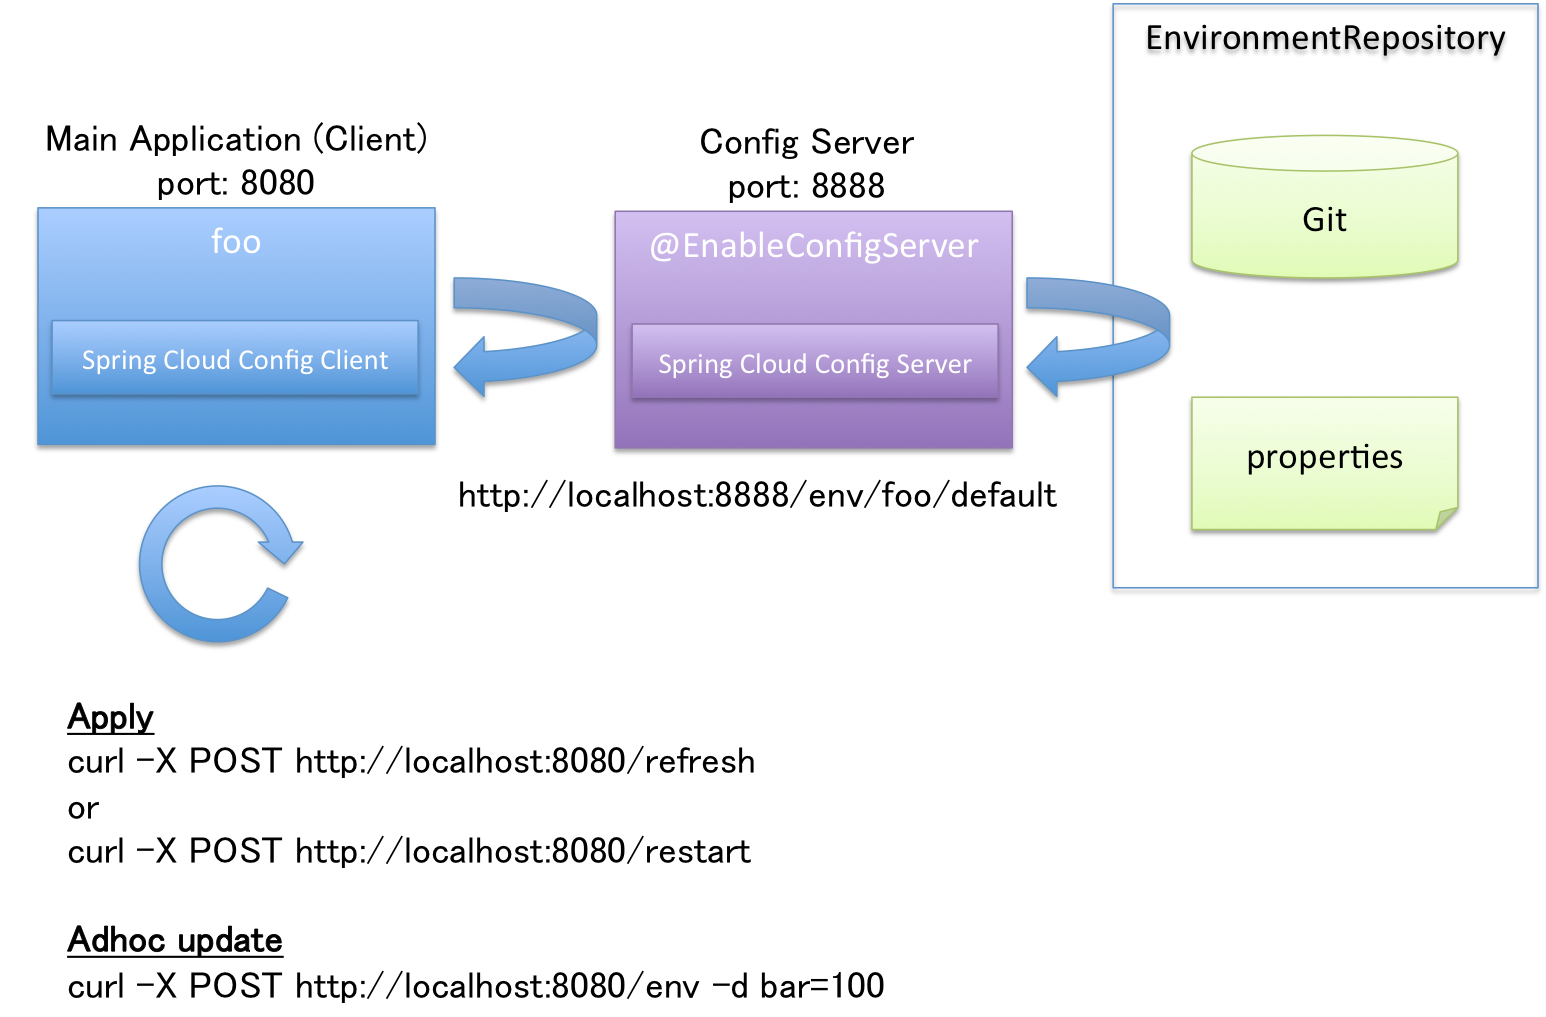
コンフィギュレーションを必要とする、"通常のアプリケーション"がClientになる。Clientが複数台あっても、Serverでコンフィギュレーションを一元管理することができる。
## 使い方
**以下の内容は1.0.0.M1バージョンにおける設定方法で、今後大きく変わる可能性がある。**
### Config Serverの構築
Config Serverの構築は極めて簡単。`org.springframework.cloud:spring-cloud-config-server`の依存関係を追加して、エントリポイントに`@EnableConfigServer`を付けるだけ。
pom.xmlの設定例は後述する。
エントリポイントクラスは以下のように作成する。
``` java
package demo;
import org.springframework.boot.SpringApplication;
import org.springframework.boot.autoconfigure.EnableAutoConfiguration;
import org.springframework.cloud.config.server.EnableConfigServer;
import org.springframework.context.annotation.ComponentScan;
@EnableAutoConfiguration
@EnableConfigServer // important!!
@ComponentScan
public class App {
public static void main(String[] args) {
SpringApplication.run(App.class, args);
}
}
```
あとはコンフィギュレーションをどこから取ってくるかをクラスパス直下の`bootstrap.yml`に記述する(`application.yml`ではないので注意)。
デフォルトでは[spring-cloud-samples/config-repo](https://github.com/spring-cloud-samples/config-repo)から取得する設定になっているが、プロパティの変更を行いたいため、このプロジェクトをforkした[making/config-repo](https://github.com/making/config-repo)から取得するように変更する。Gitの共有レポジトリのURLを`spring.platform.config.server.uri`プロパティに設定する。
```
spring.platform.config.server.uri: https://github.com/making/config-repo
```
最後にpom.xmlの設定。まだ正式版がリリースされていないため、少し冗長な記述になっているが、1.0.0.RELEASEが出たらもう少し簡潔に書けるはず。重要なのは`org.springframework.cloud:spring-cloud-config-server`の設定だけ。
``` xml
4.0.0
demo
configserver
1.0-SNAPSHOT
jar
org.springframework.boot
spring-boot-starter-parent
1.1.5.RELEASE
org.springframework.cloud
spring-cloud-starters
1.0.0.M1
pom
import
UTF-8
demo.App
1.8
org.springframework.boot
spring-boot-starter-web
org.springframework.cloud
spring-cloud-config-server
org.springframework.boot
spring-boot-starter-test
test
spring-milestones
Spring Milestones
http://repo.spring.io/milestone
false
spring-milestones
Spring Milestones
http://repo.spring.io/milestone
false
org.springframework.boot
spring-boot-maven-plugin
org.springframework
springloaded
${spring-loaded.version}
```
プロジェクト構成は以下のようになる。
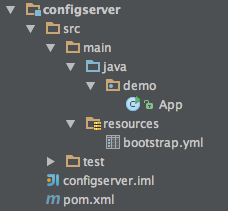
`App`クラスを実行すると8888番ポートでサーバーが起動する。spring-cloud-config-server-1.0.0.M1.jarにデフォルト設定が行われた`application.yml`が含まれている。
`http://localhost:8888/{name}/{env}/{label}`にアクセスすることで、アプリケーション毎の環境(profile)毎のコンフィギュレーションを取得できる。
* `name`=アプリケーション名
* `env`=profile名 (デフォルトは`default`)
* `label`=branch名 (デフォルトは`master`)
だと思えば良い。`label`は省略可能である。
[making/config-repo](https://github.com/making/config-repo)の例だと以下の扱いとなる。
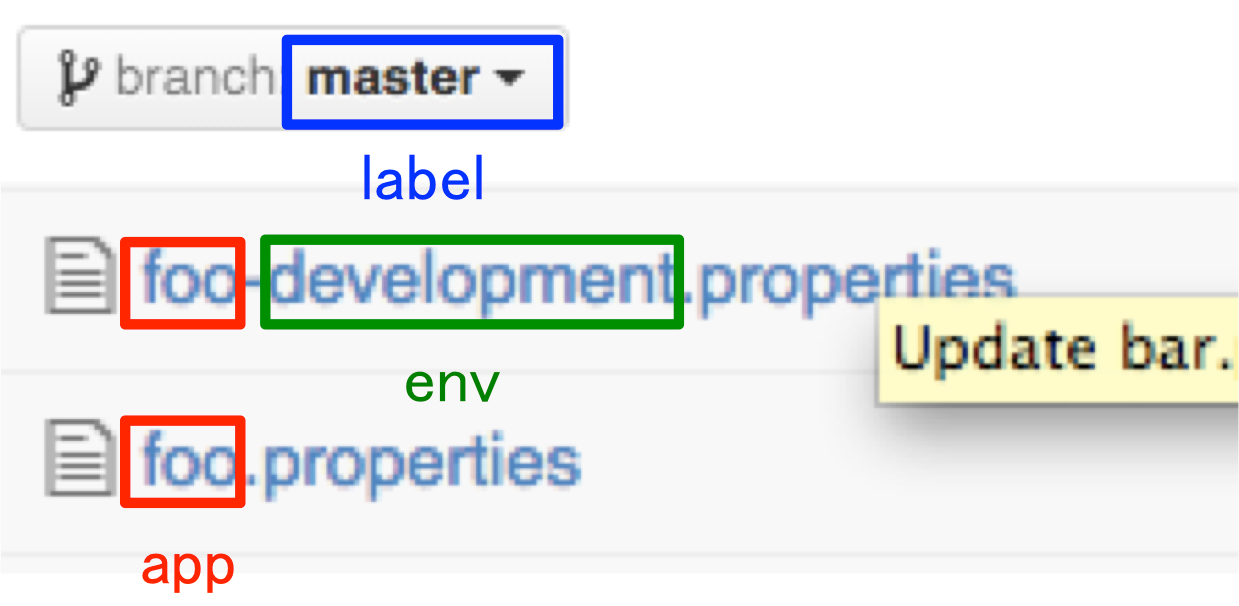
* http://localhost:8888/foo/default にアクセスすると[foo.properties](https://github.com/making/config-repo/blob/master/foo.properties)のコンフィギュレーションを取得でき、
* http://localhost:8888/foo/development にアクセスすると[foo.properties](https://github.com/making/config-repo/blob/master/foo.properties)のコンフィギュレーションを[foo-development.properties](https://github.com/making/config-repo/blob/master/foo-development.properties)で上書きして取得できる。
``` bash
$ curl -X GET http://localhost:8888/foo/default | jq .
{
"propertySources": [
{
"source": {
"foo": "b",
"test": "This is a test",
"bar": "123456"
},
"name": "https://github.com/making/config-repo/foo.properties"
},
{
"source": {
"info.url": "https://github.com/spring-cloud-samples",
"info.description": "Spring Cloud Samples"
},
"name": "https://github.com/making/config-repo/application.yml"
}
],
"label": "master",
"name": "default"
}
```
次に`env`を`development`に変えてリクエストを送る。
``` bash
$ curl -X GET http://localhost:8888/foo/development | jq .
{
"propertySources": [
{
"source": {
"bar": "spam"
},
"name": "https://github.com/making/config-repo/foo-development.properties"
},
{
"source": {
"foo": "b",
"test": "This is a test",
"bar": "123456"
},
"name": "https://github.com/making/config-repo/foo.properties"
},
{
"source": {
"info.url": "https://github.com/spring-cloud-samples",
"info.description": "Spring Cloud Samples"
},
"name": "https://github.com/making/config-repo/application.yml"
}
],
"label": "master",
"name": "development"
}
```
`default`と`development`の値が両方返ってくる。Client側でどちらを使うか判断することになる(この場合は`development`を優先する)
Github上の`foo-development.properties`を以下のように変更する。
```
bar: Updated!
foo: Added!
```
再度`http://localhost:8888/foo/development`にリクエストを送ると、
``` bash
$ curl -X GET http://localhost:8888/foo/development | jq .
{
"propertySources": [
{
"source": {
"foo": "Added!",
"bar": "Updated!"
},
"name": "https://github.com/making/config-repo/foo-development.properties"
},
{
"source": {
"foo": "b",
"test": "This is a test",
"bar": "123456"
},
"name": "https://github.com/making/config-repo/foo.properties"
},
{
"source": {
"info.url": "https://github.com/spring-cloud-samples",
"info.description": "Spring Cloud Samples"
},
"name": "https://github.com/making/config-repo/application.yml"
}
],
"label": "master",
"name": "development"
}
```
Gitをpullして、最新の値を返す。(以降の説明では`git push -f origin HEAD^:mastere`で内容を元に戻している)
認証・認可設定やプロパティ値の暗号化・復号に関しては[ドキュメント](http://cloud.spring.io/spring-cloud-config/spring-cloud-config.html#_spring_cloud_config_server)を参照。
### Config Clientの構築
次にClientについて説明する。Clientは普通のSpring Bootアプリケーションに`org.springframework.cloud:spring-cloud-config-client`の依存関係を追加するだけでいい。自動的にConfig Serverに接続し、Config Server経由でプロパティを使用するようになる。
`org.springframework.boot:spring-boot-starter-actuator`も依存関係に加えておく。
Clientのアプリケーション名は`bootstrap.yml`に`spring.application.name`キーで定義する。
```
spring:
application:
name: foo
```
Config Serverの接続先ははデフォルトでは`http://localhost:8888`の`env=default`、`label=master`を使用される。上書きしたい場合は以下のように設定できる。
```
spring:
application:
name: foo
cloud:
config:
env: default # optional
label: master # optional
uri: http://localhost:8888 # optional
```
クライアントのエントリポイントとなる`ClientApp`クラスに、簡単なControllerを実装する。`bar`プロパティを使うようにしておく。
``` java
package demo;
import org.springframework.beans.factory.annotation.Value;
import org.springframework.boot.SpringApplication;
import org.springframework.boot.autoconfigure.EnableAutoConfiguration;
import org.springframework.context.annotation.ComponentScan;
import org.springframework.web.bind.annotation.RequestMapping;
import org.springframework.web.bind.annotation.RestController;
@EnableAutoConfiguration
@ComponentScan
@RestController
public class ClientApp {
@Value("${bar:World!}")
String bar;
@RequestMapping("/")
String hello() {
return "Hello " + bar + "!";
}
public static void main(String[] args) {
SpringApplication.run(ClientApp.class, args);
}
}
```
pom.xmlは以下の通り
``` xml
4.0.0
demo
configclient
1.0-SNAPSHOT
jar
org.springframework.boot
spring-boot-starter-parent
1.1.5.RELEASE
org.springframework.cloud
spring-cloud-starters
1.0.0.M1
pom
import
UTF-8
demo.ClientApp
1.8
org.springframework.boot
spring-boot-starter-web
org.springframework.cloud
spring-cloud-config-client
org.springframework.boot
spring-boot-starter-actuator
org.springframework.boot
spring-boot-starter-test
test
spring-milestones
Spring Milestones
http://repo.spring.io/milestone
false
spring-milestones
Spring Milestones
http://repo.spring.io/milestone
false
org.springframework.boot
spring-boot-maven-plugin
org.springframework
springloaded
${spring-loaded.version}
```
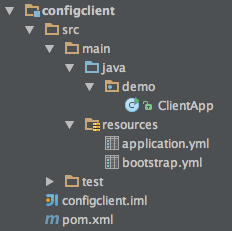
プロジェクト構成は以下のようになる。(`application.yml`は後で説明する。)
Spring Boot Actuatorの機能で[http://localhost:8080/env](http://localhost:8080/env)にアクセスして、`PropertySource`一覧を見ると、Config Serverからプロパティを取得できていることがわかる。

単プロパティの取得も可能。
``` bash
$ curl http://localhost:8080/env/bar
123456
```
Controllerにアクセスすると、
``` bash
$ curl http://localhost:8080
Hello 123456!
```
Config Server上のプロパティがインジェクションされていることがわかる。
#### 動的コンフィギュレーション変更
次にConfig Serverの値を以下のように[書き換えて](https://github.com/making/config-repo/commit/28a401b163cc77daba5478946b845362e28cb306)みる。
```
bar: Spring Boot
```
単プロパティにアクセスすると、
``` bash
$ curl http://localhost:8080/env/bar
123456
```
この段階ではConfig Serverの変更は反映されていない。反映させるためには`refresh`エンドポイントにPOSTでアクセスする必要がある。
``` bash
$ curl -X POST http://localhost:8080/refresh
["bar"]
$ curl http://localhost:8080/env/bar
Spring Boot
```
これでクライアントの`PropertySource`には反映させることができた。ではもう一度
``` bash
$ curl http://localhost:8080
Hello 123456!
```
既にDIされたプロパティをrefreshで変更することはできない。(このControllerはSingletonスコープであるため)
再度DIするには`restart`エンドポイントにPOSTでアクセスしてDIコンテナを再起動する必要がある。
``` bash
$ curl -X POST http://localhost:8080/restart
{"message":"Restarting"}
```
ログを見ればわかるが、DIコンテナが再起動する(数秒かかる)。
``` bash
$ curl http://localhost:8080
Hello Spring Boot!
```
これでアプリケーションを再起動することなく、コンフィギュレーションを変更することが出来た。
ちなみに、`restart`エンドポイントはデフォルトでは無効になっている。これを有効にするには、`application.yml`に以下のように設定する必要がある。
```
endpoints:
restart:
enabled: true
```
#### Adhocなコンフィギュレーション変更
Config Serverを書き換えなくても、Client側でAdohocにコンフィギュレーションを変更することができる。
以下のように`env`エンドポイントにプロパティをPOSTすれば良い。
``` bash
$ curl -X POST http://localhost:8080/env -d bar="Spring Cloud"
{"bar":"Spring Cloud"}
```
この時点でアプリケーションの`PropertySource`は書き変わるので、
プロパティをGETすると、更新された値を取得できる。
``` bash
$ curl http://localhost:8080/env/bar
Spring Cloud
```
再DIは行われないのでControllerの結果は変わらない。
``` bash
$ curl http://localhost:8080
Hello Spring Boot!
```
`refesh`しても同じである。
``` bash
$ curl -X POST http://localhost:8080/refresh
[]
$ curl http://localhost:8080
Hello Spring Boot!
```
この場合も`restart`でDIコンテナを再起動することで、Controllerの結果を書き換えることが出来る。
``` bash
$ curl -X POST http://localhost:8080/restart
{"message":"Restarting"}
$ curl http://localhost:8080
Hello Spring Cloud!
```
#### Refreshスコープの導入
ここまで説明して、普通の人なら思うと思うが、DIコンテナの再起動は時間がかかるのであまりうれしくない。
そこで導入されたのがRefreshスコープである。`@RefreshScope`アノテーションがついたBeanはDIコンテナを再起動しなくても、`refresh`エンドポイントにPOSTすれば、そのBeanが再生成される。
`ClientApp`を修正する。
``` java
package demo;
import org.springframework.beans.factory.annotation.Value;
import org.springframework.boot.SpringApplication;
import org.springframework.boot.autoconfigure.EnableAutoConfiguration;
import org.springframework.cloud.context.config.annotation.RefreshScope;
import org.springframework.context.annotation.ComponentScan;
import org.springframework.web.bind.annotation.RequestMapping;
import org.springframework.web.bind.annotation.RestController;
@EnableAutoConfiguration
@ComponentScan
@RestController
@RefreshScope // important!
public class ClientApp {
@Value("${bar:World!}")
String bar;
@RequestMapping("/")
String hello() {
return "Hello " + bar + "!";
}
public static void main(String[] args) {
SpringApplication.run(ClientApp.class, args);
}
}
```
アプリケーションを再起動すると、Adhocな変更は失われていることがわかる。
```
$ curl http://localhost:8080
Hello Spring Boot!
```
再度、変更する。
```
$ curl -X POST http://localhost:8080/env -d bar="Spring Cloud Config"
{"bar":"Spring Cloud Config"}
```
次に`refresh`エンドポイントにPOSTする。
```
$ curl -X POST http://localhost:8080/refresh
[]
```
さっきはこの状態ではControllerは何も変化しなかったが、今回は`@RefreshScope`をつけたので、
```
$ curl http://localhost:8080
Hello Spring Cloud Config!
```
プロパティを反映させることができた!
ちなみに、
* `@ConfigurationProperties`が設定されたBean
* ログレベルに関するプロパティ`logging.level.*`
は最初からRefreshスコープである。
----
サンプルコードは[こちら](https://github.com/making/config)。
SpringのDIコンテナは改めて優秀だとおもった。この機能はSpring本体に取り込まれるんじゃなかろうか。
そして、こういったことをほぼ設定無しで実現できてしまうSpring Bootというか`@Conditinal`の仕組みの導入はSpringにとって革命的だったんだな〜と思う。
この記事で説明した内容は2014/11/15のJJUG CCC 2014 Fallの[僕のセッション(ハンズオン)](http://www.java-users.jp/?page_id=1292#R5-3)で扱うので、この記事を読んで手を動かして試してみたいと思った場合は是非[参加](http://jjug.doorkeeper.jp/events/16385)してほしい。